
How to Remove Ads on Your Devices Using AdGuard DNS
Ads are a common nuisance across devices, from mobile phones to computers, often interrupting your browsing experience or making apps slower and cluttered. Fortunately, you can remove ads without installing additional software by configuring AdGuard DNS. AdGuard DNS is a free and effective solution that blocks ads, trackers, and even malicious websites at the network level, meaning all devices connected to your Wi-Fi network can benefit.
In this article, we’ll guide you through the process of setting up AdGuard DNS on various devices, including smartphones, tablets, computers, and routers, to ensure a seamless and ad-free experience across all your gadgets.
What is AdGuard DNS?
AdGuard DNS is a free, privacy-focused DNS service that blocks ads and trackers by filtering DNS requests. Instead of resolving requests to ad servers, it simply blocks them, preventing ads from loading. It works at the DNS level, meaning the device sends a request to AdGuard DNS every time it tries to load a webpage or connect to a server. If the server is identified as an ad or tracker, it’s blocked. This method is much less resource-intensive than using traditional ad-blockers and can provide system-wide ad-blocking for all your devices.
Advantages of Using AdGuard DNS
- System-wide blocking: Works across all apps, browsers, and devices without installing specific software.
- Cross-platform: Whether you’re on Android, iOS, macOS, Windows, or even Linux, AdGuard DNS can block ads.
- Privacy-focused: It helps block not only ads but also trackers, protecting your data from being harvested.
- Speed boost: Pages may load faster without ads, and devices run more efficiently with fewer resources consumed by ad scripts.
How to Set Up AdGuard DNS
AdGuard DNS can be configured on individual devices or at the router level to block ads across your entire network. Here’s how to set it up on different platforms:
1. Setting Up AdGuard DNS on iOS and Android
On smartphones and tablets, configuring AdGuard DNS is straightforward. Both iOS and Android allow users to manually configure DNS settings.
On iOS (iPhone/iPad):
- Go to Settings and tap Wi-Fi.
- Find your connected network and tap the “i” icon next to it.
- Scroll down to DNS and tap Configure DNS.
- Change the setting from Automatic to Manual.
- Remove any existing DNS entries and tap Add Server.
- Enter AdGuard DNS server addresses:
- Primary DNS:
94.140.14.14 - Secondary DNS:
94.140.15.15
- Tap Save and exit the settings.
On Android:
Configure your DNS server in your device settings
Go to Settings → Network and Internet (or Wi-Fi and Internet, depending on your OS version).
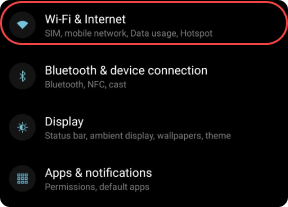
Choose “Advanced”, then tap “Private DNS”.
Select “Private DNS provider hostname” option and enter the following address:
dda86328.d.adguard.com
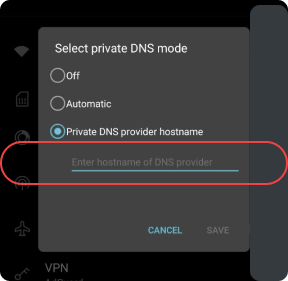
Tap Save.
All done! Your device is successfully connected to AdGuard DNS.
2. Setting Up AdGuard DNS on Windows
Configure your DNS server in your device settings
You’ll have to connect to public AdGuard DNS servers and link your IP. If IP addresses of two or more devices match, their stats will be merged. You’ll also have to relink your device every time its IP address changes.
Open these instructions on the device that you want to connect to AdGuard DNS.
Copy link to the instructions
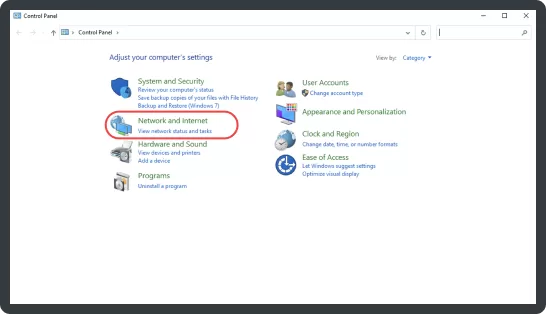
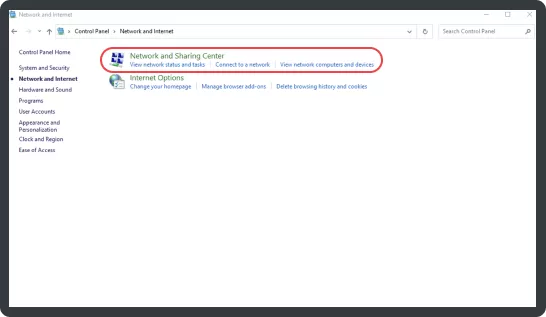
Click on the Start menu → Control Panel.
Click “Network and Internet”.
Click “Network and Sharing Center”.
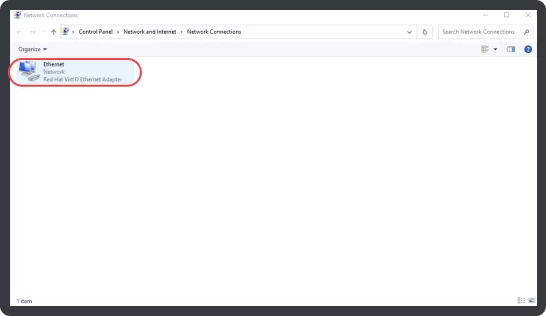
Select “Change Adapter Settings” from the menu on the left.
Click the network you are currently connected to.
On the bar above the connection icon, select “Change settings of this connection”.
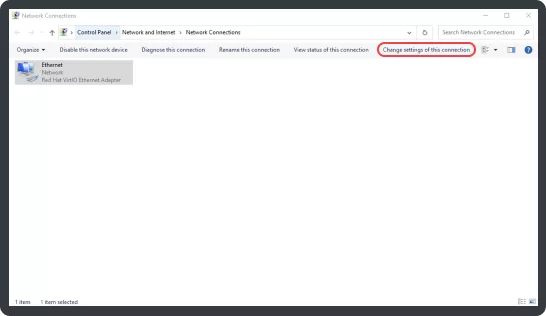
Note: this option may be hidden in the drop-down menu, accessible by clicking the icon with two small arrows on the same menu bar.
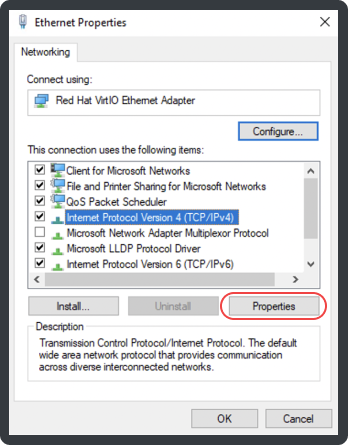
Select “Internet Protocol Version 4”.
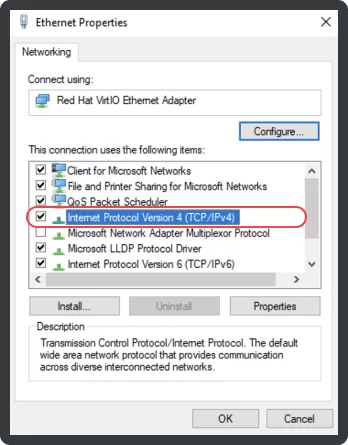
Click “Properties”.
Select “Use the following DNS server addresses”.
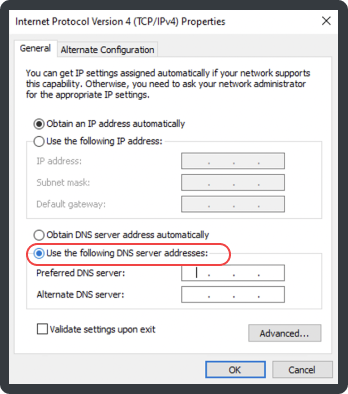
Enter the following addresses in the “Preferred DNS server” and “Alternate DNS server” fields.
94.140.14.49
94.140.14.59
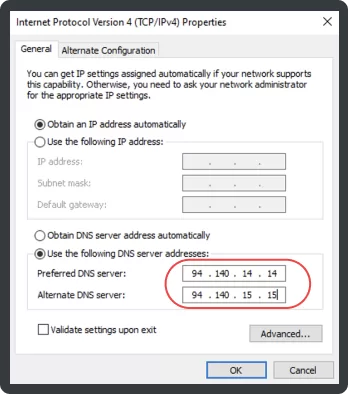
Click “OK”.
Go to “Internet Protocol Version 6” → “Properties”.
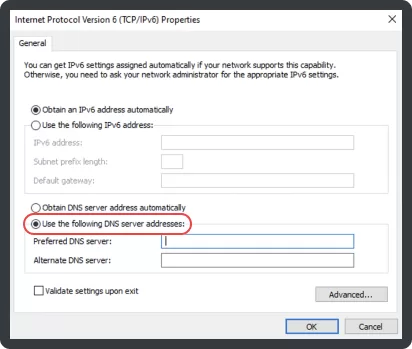
Select “Use the following DNS server addresses”.
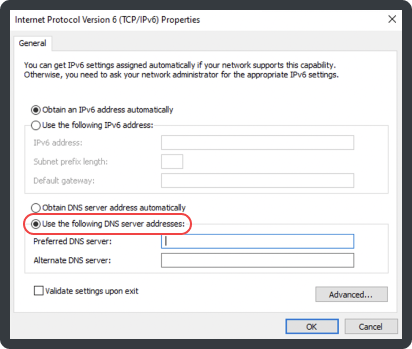
Enter the following addresses in the “Preferred DNS server” and “Alternate DNS server” fields.
2a10:50c0:0:0:0:0:ded:ff
2a10:50c0:0:0:0:0:dad:ff
Click “OK”.
Click “Close”.
Link your IP below.
Linked IPv4 address
Link your device’s IPv4 address to your server — the device’s requests will be recognized automatically
You’ll have to relink your device’s IP address every time it changes
- Connect to one of the following addresses on your deviceIPv4 address:94.140.14.4994.140.14.59
- Link your device’s IP address to your DNS serverLinked IP address:Not linkedLink IP address
For Windows 11, the process is similar but can be accessed via Settings > Network & internet > Wi-Fi > Hardware properties.
3. Setting Up AdGuard DNS on macOS
On a Mac, configuring AdGuard DNS is just as simple:
- Go to System Preferences, then click Network.
- Select your active connection (Wi-Fi or Ethernet) and click Advanced.
- Go to the DNS tab.
- Click the + button and enter the AdGuard DNS addresses:
- 94.140.14.14
- 94.140.15.15
- Click OK, then Apply to save your settings.
4. Setting Up AdGuard DNS on Routers
By configuring AdGuard DNS on your router, you can block ads across all devices connected to your network. The steps may vary depending on the router model, but the general process remains the same.
Steps:
- Log in to your router’s admin panel (usually through your browser by entering
192.168.1.1or192.168.0.1). - Look for the DNS settings. This is usually found under Internet, WAN, or LAN settings.
- Replace the existing DNS addresses with AdGuard DNS:
- Primary DNS:
94.140.14.14 - Secondary DNS:
94.140.15.15
- Save the settings and reboot your router.
Once configured, all devices on your network will automatically use AdGuard DNS, providing ad-blocking without the need for individual setup.
5. Setting Up AdGuard DNS on Gaming Consoles and Smart TVs
Gaming consoles like PlayStation, Xbox, and Smart TVs can also benefit from AdGuard DNS. Here’s a general outline for setup on consoles:
- Go to Network Settings.
- Choose Manual Configuration for DNS.
- Enter AdGuard DNS server addresses (
94.140.14.14and94.140.15.15). - Save the settings and restart your device.
Similarly, on Smart TVs, DNS settings are usually found under Network Settings, where you can manually input the AdGuard DNS addresses.